Sunday, March 29, 2009

Happy Happy FlowaBella

FlowaBella makes this sista Happy Happy! In keeping with my springy mood of late (no thanks to uncooperative weather with spitting snow flurries today!), I had some fun with my girlfriend Bella. Two Scoops paper by Basic Gray has been sitting on my shelf for way too long, and it was calling Bella's name! I had fun choosing the bright and cheery papers to match Bella's springy attitude and her wirey hair. That's the very reason I chose to include ric-rac on my flower/button embellishment - because I think it looks much like Bella's hair! LOL

All Bella's were stamped in SU Chocolate Brown ink, colored with copics, cut and embossed with Spellbinders Long Classic Rectangles, and then stippled with a pale yellow background while still in the die. I am love love loving having these pre-made button embellishments on hand. They really get my mojo in gear!

Notice Bella's polka dot skirt? After I colored with copics, I held a 0-colorless copic marker in place at various points to wash out the color, thus creating dots. Go copic markers!

Inside card, with matching DP and sentiment. Card base is Kraft, my latest new love. I dream in Certainly Celery and Bashful Blue, but lately Kraft has been making guest appearances!

Matching Flowa envelopes for FlowaBella! Okay, so have you seen the new Bella release? Meet Ketto ... she's coming to my mailbox soon! Who can resist a girlfriend with cute wirey hair?

Sunday, March 22, 2009

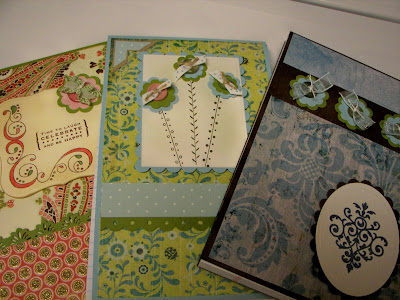
Spring Fever and Notebook Mania

One sunny afternoon, I made a bunch of Spring embellishments using a cuttlebug flower die, and some buttons and ribbons. I sat outside on my deck and tied buttons and ribbons (great way to use your scraps and save some $$)! Then, I broke into my stash of 5x8 lined notepads and went to town!

This blue/brown notepad is part of a gift, so I covered a small kraft box with matching DP. The Damask stamp is something I picked up from Paper Source, in Georgetown, when I was visiting my son in DC. I la-la-love that stamp and I can't wait to make some stationary with it.

This blue/green Springy little number is for my sweet sister. Stems are stamped separately, aren't they too cute! I dream in Bashful Blue and Certainly Celery sometimes! But adding Old Olive cardstock to the mix just sends me! Dig that tiny polka dot ribbon too.

This pink/green notepad sparkles - for real! It is covered with My Minds Eye glittery paper, and embellished simply. I am also adding this notepad to a gift ensemble. The ruffled ribbon tuff is actually on elastic, sold by the yard at Archivers. Get thee there - OH so cute! Spend $1.39 and be happy!

I also covered the inside of my notepads with a snippet of matching DP to cover the notebook binding. It was SO FUN to mix and match papers with my ready-made Springy embellishments.

Note: Junior Notepads vary slightly in size. I cut/measured/scored depending on thickness of notebook. The front cover is scored and adhered on the back on the notebook just a few inches below the score line. Then I cut a separate piece of cardstock 5x8 and covered the entire back to make it pretty. If you need help, email me!

Friday, March 20, 2009

Bloomin' With Love

I have Spring on my mind! As in ... planting flowers! But for now, I'll have to do it on paper and wait for warmer temps. Becky at Inking Idaho inspired me to do these springy cards.

There are SO many cute stamps in this set - SU Bloomin' With Love! The wheel barrel is stamped twice - once on white cardstock and once on designer paper and cut out. I masked the wheel barrel and flower pots when stamping - what a cool technique!

Kraft cardstock is a great compliment to Parisian Breeze DP! I simply flipped the 2-sided DP for this card, showing the blue polka side instead of the brown floral side shown above. It is noteworthy that Parisian Breeze is a speciality DP which is heavy weight cardstock! Nice!

Stamped images are cut and framed with Spellbinders Rectangle Die, and I added a cute photo corner from SU punches. This is one of my go-to punches - I find that photo corners can really pop on a finished card!

Images are colored with copics, and then I used a stipple brush while it was still in the Spellbinders Die to get a nice background. Notice the wheel treatment? A jumbo eyelet with a crystal brad inside!

Here's the inside card treatment ... a matching strip of Parisian Breeze DP with the sentiment. And another little flower for good measure!

Close up of inside sentiment and matching envelope. I DO hope your day is blooming with love!

Monday, March 16, 2009

Potential for Spring

I love love love Michelle Wooderson's blog, and she made some cute cards inspired by ATC's here. I am not a big fan of ATC's, but I would be if they were this cute! Cute enough to put on a card front! This is my case of Michelle's cute cards.


Cardstock is Kraft, Pink Pirouette (I LOVE this pink!), and Baja Breeze for the sentiment. Flower stamp is from SU True Friends, inked with markers. I stamped the lines with Lined Paper Backgrounder by Cornish Heritage Farms. Sentiment is a retired SU set, but any sentiment would work. Image is cut with Spellbinders Rectangle Nesties.

This picture shows the matching envelopes. If you care enough to send the very best ... and I know you do ... ink up some matching envelopes!

This time, I also lined the envelopes to bring out the Baja Breeze color on the card.

Recently, I purchased a bunch of Kraft cardstock, and let me tell you that it goes with everything! I now consider it a stash staple. So are buttons. Every piece of clothing I buy that comes with extra buttons -- I snip those right off and put them in my button stash. I used a bit of jute to tie the buttons onto these cards.

Another good picture --- how can I resist? I LOVE this card! Notice the pink crystal brad for the flower center? I also used buttons for some of the flower centers.
Finally, I added some special treatment on the inside. A Kraft strip, stamped with Polka Dot Basics by PaperTrey Ink (to match the card front), and a matching stamp from the SU True Friend set, punched with circles. I'm just over the moon!

Sunday, March 8, 2009

Pottery Garden

How about one of my finds from the Heirloom Rubber Stamp Show that I attended yesterday? After hours of strolling the booths {and spending money!}, my girlfriends and I stopped for a quick bite to eat ... and then I came home ready to CREATE! The message was clear to Kevin when I said "I'm going upstairs to change into my stamping clothes!" Here's what I made:

These are 5x7 sheets of stationery --- in other words it is not a card that opens up. The message is intended to be written on the front, short and sweet! This is a 5-piece stamp set made by a most fascinating company, Rubber Stamp Tapestry. They had so many beautiful sets it was hard to choose just one! I know that I am going to use this set over and over again.

Here is a close up of my first notecard. I used my long rectangle nesties to frame the stamped Pottery Garden, and added a nice sentiment at the bottom separated by a thin piece of cardstock. Note the flower clusters on both sides of the sentiment? You can do so much with this stamp set!

Here is a close up of my second notecard. This time, I cut my card a bit smaller so the oval nestie could be adhered as a card-topper (hangs off the edge of the card). I then created a custom 1" strip of stamped DP using the Pottery Garden stamps and adhered it across the bottom. I really like this look!

I stamped the Pottery Garden directly onto the top of my third notecard, separated by a thin strip of DP, rounded the top edges only, and added a sweet sentiment at the bottom. I did a lot of aging with a stipple brush, because I think it lends itself well to the Pottery Garden. Since these stamps are so unique, I prepared a step-by-step tutorial to demonstrate. Here we go!

To start, I stamped a row of pots in Chocolate Chip on watercolor paper, but any good quality cardstock will do. This is one stamp - five pots, but you could easily mask your stamp if you did not want all five pots.

All of the flower and leaves stamps in this set are mounted on a wood pencil. How cool is that? To build my flowers, I first stamped the itsy bitsy pinwheel flower in Perfect Plum. Stamp 2 or 3 times to get a lighter color with the second impressions.

Next, stamp itsy petal flower in Night of Navy, stamping in clusters. The pencil stamps are so quick and easy!

Next, I stamped the itsy accent leaf in Mellow Moss. The stamp company provides a placement line on the pencil stamp indicating the direction of the leaf, so it is very easy to position the image however you want your leaves to fall.

Finally, I stamped the Tiny Evergreen Branch in Always Artichoke. This is a good filler branch and really makes your image take shape! At this point, if you feel you need more flowers, you can add more color -- or not! It's up to you.

I then used two copic markers that added so much! I added a little bit of color to the pots (Y26-Mustard) and shaded the bottom of the pots with W1-Warm Gray, which added depth so the pots don't look like they are floating in air.

After centering and cutting my stamped image with a nestie, I left it in the nestie and stippled it. {this is where I would use an airbrush system if Santa ever brought one to me!} But the stipple brush trick is easy and I encourage you to try it! Nesties lend themselves so well to stenciling! On this particular stamped image, I stippled the top half with Soft Sky and the bottom half with River Rock. You can scroll back up to the finished cards to see the effect - so pretty!
I hope you enjoyed the Pottery Garden as much as I did! What a beautiful bang for your buck, in my opinion!

Friday, March 6, 2009

Friend to Friend

I needed a quick card for a friend at work, and this card was just that! Don't you just love it when that happens! SU Pocket Sillouettes was sitting on my table, so that's what I used. What a fun little stamp set, coupled with a Martha Stewart arched lattice border punch and a corner rounder. The brown satin polka dot ribbon is from Michaels.

Let's concentrate on the flower for just a minute. At my request, my 86 year-old sweetheart mamma crocheted several flowers for my paper-crafting pleasure! I have big ones and little ones in all colors ... all because I saw them in a magazine and showed my mamma. Believe you me sista, if I had to crochet the flower for this quick and easy card, we would still be looking at a blank page here!

Inside card and envelope to match! How many of you know that quick and easy is good!